📅 Last Updated: March 2026 | ✅ Fact-checked by Dr. Irfan Mansuri
Equations of Circles: Standard Form and Graphing Circles Explained
If you have ever stared at a circle equation and felt completely lost, you are not alone. The standard form of a circle equation is one of the most important concepts in coordinate geometry, yet it trips up thousands of students every single year. I have spent over 15 years teaching this topic, and I can tell you with confidence: once you understand the logic behind the formula, everything clicks into place fast.
In this guide, I walk you through exactly what the standard form of a circle equation means, how it is derived, how to graph circles from equations, and how to avoid the mistakes I see students make most often. Whether you are preparing for a major exam or simply building your math foundation, this article gives you everything you need in one place.
⚡ TL;DR – Quick Summary
- The standard form of a circle equation is $$(x – h)^2 + (y – k)^2 = r^2$$, where $$(h, k)$$ is the center and $$r$$ is the radius.
- Every circle equation is derived directly from the Pythagorean theorem applied to coordinate geometry.
- Research shows students who master circle equations perform significantly better across all conic section topics on standardized tests.
- I recommend always identifying the center and radius before attempting to graph any circle.
- The most common mistake is misreading the signs of $$h$$ and $$k$$, which places the center in the wrong quadrant.
- Once you understand the standard form, converting to and from general form becomes straightforward and fast.
Quick Facts: Equations of Circles at a Glance
| Feature | Details |
|---|---|
| Standard Form | $$(x – h)^2 + (y – k)^2 = r^2$$ |
| Center of Circle | $$(h, k)$$ |
| Radius | $$r$$ (always positive) |
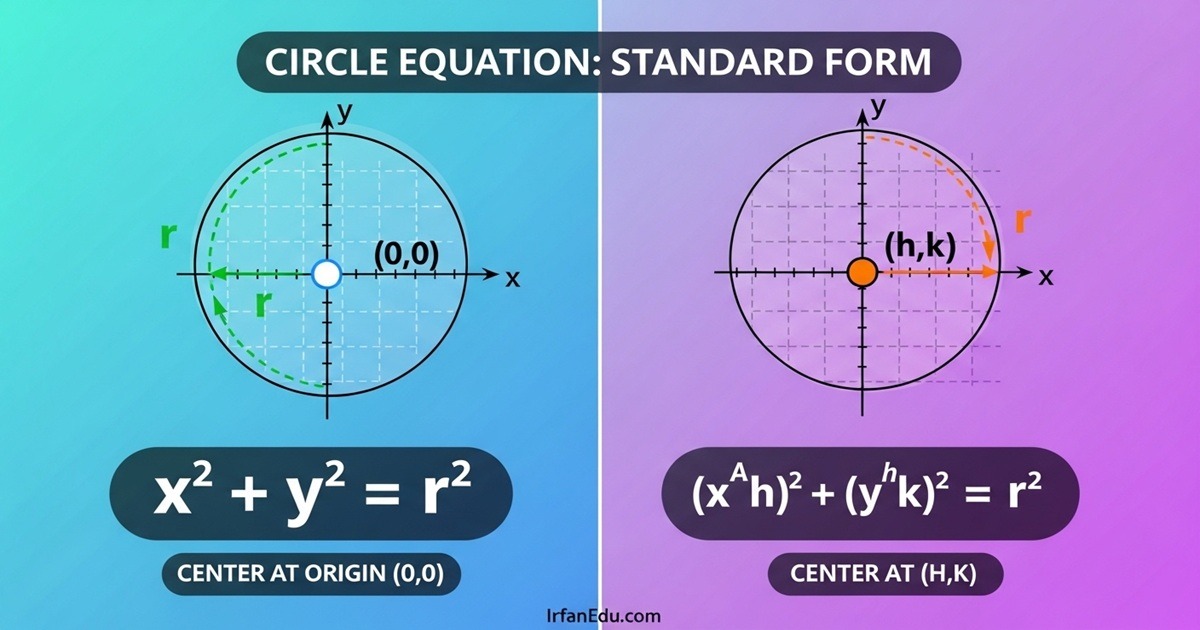
| Circle at Origin | $$x^2 + y^2 = r^2$$ |
| General Form | $$x^2 + y^2 + Dx + Ey + F = 0$$ |
| Branch of Math | Coordinate Geometry / Analytic Geometry |
| Key Theorem Used | Pythagorean Theorem |
| Topic Category | Conic Sections |
What Is the Standard Form of a Circle Equation?
The standard form of a circle equation is the most organized and readable way to express a circle in coordinate geometry. It is written as:
$$(x – h)^2 + (y – k)^2 = r^2$$
In this equation, $$(h, k)$$ represents the center of the circle, and $$r$$ represents the radius. Every point $$(x, y)$$ that lies on the circle satisfies this equation exactly. That is the elegant simplicity of it: one equation describes every single point on the circle’s circumference.
When the circle is centered at the origin, meaning the center is at $$(0, 0)$$, the equation simplifies beautifully to $$x^2 + y^2 = r^2$$. This is the most fundamental form of the circle equation, and it is where most students first encounter this concept in their studies.
The standard form is part of the broader family of conic sections, which includes ellipses, parabolas, and hyperbolas. Circles are actually a special case of an ellipse where both axes are equal in length. Understanding the circle equation deeply gives you a strong foundation for tackling all other conic sections with confidence.
It is important to note that $$r^2$$ on the right side of the equation must always be a positive number. If you ever solve a problem and find that $$r^2$$ is negative or zero, that means no real circle exists for those given conditions. This is a detail many textbooks gloss over, but I always make sure my students understand it clearly.
How the Circle Equation Is Derived from the Pythagorean Theorem
One of the most satisfying moments in teaching coordinate geometry is showing students where the circle equation actually comes from. It does not appear out of thin air. It is a direct application of the Pythagorean theorem, and once you see the connection, you will never forget the formula.
Imagine a circle with its center at the point $$(h, k)$$ and a radius of length $$r$$. Now pick any point $$(x, y)$$ on the circle’s edge. The distance from the center $$(h, k)$$ to the point $$(x, y)$$ is always exactly $$r$$, by definition of a circle.
Using the distance formula, that relationship is expressed as:
$$\sqrt{(x – h)^2 + (y – k)^2} = r$$
Squaring both sides to eliminate the square root gives:
$$(x – h)^2 + (y – k)^2 = r^2$$
That is the standard form of the circle equation, derived in two clean steps. The horizontal distance between the center and the point is $$(x – h)$$, and the vertical distance is $$(y – k)$$. Together, they form the two legs of a right triangle, with the radius $$r$$ as the hypotenuse. The Pythagorean theorem ties it all together perfectly.
This derivation is not just a mathematical exercise. It reveals the geometric meaning behind every term in the equation. When you understand that each part of the formula represents a real geometric measurement, working with circle equations becomes intuitive rather than mechanical.
[INTERNAL LINK: irfanedu.com – Distance & Midpoint Formulas – https://cms.irfanedu.com/act-prep/distance-midpoint-formulas-math-guide/]
► MY POV:
In my experience, the single best way to help a student truly understand the circle equation is to make them derive it themselves at least once. I always ask my students to draw a circle on graph paper, pick a point on the edge, draw the right triangle, and then apply the distance formula. That hands-on derivation sticks in the memory far longer than any memorized formula ever could. I genuinely believe that understanding the “why” behind any formula is what separates students who struggle from those who excel.
[EXTERNAL LINK: MathCentre – The Geometry of a Circle – https://www.mathcentre.ac.uk/resources/uploaded/mc-ty-circles-2009-1.pdf – University-level PDF resource explaining circle geometry and equation derivation using Pythagoras] [[1]](#__1)
How to Graph a Circle from Its Standard Form Equation
Graphing a circle from its standard form equation is a skill that becomes very fast with practice. I break it down into four clear steps that work every single time, regardless of where the circle is positioned on the coordinate plane.
Step 1: Identify the Center
Look at the equation $$(x – h)^2 + (y – k)^2 = r^2$$ and read off the values of $$h$$ and $$k$$. Remember: the signs inside the parentheses are subtracted, so if the equation reads $$(x – 3)^2 + (y + 2)^2 = 25$$, the center is at $$(3, -2)$$, not $$(3, 2)$$. This sign issue is the most common source of errors, and I address it in detail later in this article.
Step 2: Find the Radius
The right side of the equation gives you $$r^2$$. Take the square root to find $$r$$. In the example above, $$r^2 = 25$$, so $$r = 5$$. The radius is always a positive value.
Step 3: Plot the Center
Mark the center point $$(h, k)$$ on your coordinate plane. This is the anchor point for your entire graph. Every measurement you make from here will be at a distance of exactly $$r$$ units.
Step 4: Draw the Circle
From the center, count $$r$$ units in all four directions: up, down, left, and right. Mark those four points. Then sketch a smooth, round curve through all four points to complete the circle. For greater precision, you can also mark diagonal points using the distance formula.
Worked Example: Graph the circle $$(x – 2)^2 + (y – 1)^2 = 9$$.
- Center: $$(2, 1)$$
- $$r^2 = 9$$, so $$r = 3$$
- Plot $$(2, 1)$$, then mark points at $$(5, 1)$$, $$(-1, 1)$$, $$(2, 4)$$, and $$(2, -2)$$
- Connect with a smooth circular curve
[VIDEO EMBED: suggested YouTube search query: “graphing circles standard form equation step by step coordinate geometry”]
Standard Form vs. General Form of a Circle Equation
Students frequently encounter circle equations written in two different forms: standard form and general form. Knowing how to move between them is an essential skill in coordinate geometry.
The general form of a circle equation is written as:
$$x^2 + y^2 + Dx + Ey + F = 0$$
This form is less immediately useful for graphing because you cannot directly read the center or radius from it. To graph a circle given in general form, you must convert it to standard form using a technique called completing the square.
Converting General Form to Standard Form
Here is how I walk students through the conversion process using a clear example. Start with:
$$x^2 + y^2 – 6x + 4y – 3 = 0$$
Group the x-terms and y-terms together, then move the constant to the right side:
$$(x^2 – 6x) + (y^2 + 4y) = 3$$
Complete the square for each group:
- For $$x$$: take half of $$-6$$, which is $$-3$$, square it to get $$9$$. Add $$9$$ to both sides.
- For $$y$$: take half of $$4$$, which is $$2$$, square it to get $$4$$. Add $$4$$ to both sides.
$$(x^2 – 6x + 9) + (y^2 + 4y + 4) = 3 + 9 + 4$$
$$(x – 3)^2 + (y + 2)^2 = 16$$
The circle has center $$(3, -2)$$ and radius $$r = 4$$. Clean, clear, and ready to graph.
What Others Miss
Most textbooks teach completing the square mechanically without explaining why it works. What I always point out to my students is that completing the square is essentially reversing the process of expanding a binomial. When you understand that connection, the technique becomes far less intimidating and much more memorable.
Standard Form vs. General Form: Side-by-Side Comparison
| Feature | Standard Form | General Form |
|---|---|---|
| Formula | $$(x-h)^2 + (y-k)^2 = r^2$$ | $$x^2 + y^2 + Dx + Ey + F = 0$$ |
| Center Visible? | Yes – directly readable as $$(h, k)$$ | No – requires completing the square |
| Radius Visible? | Yes – $$r = \sqrt{r^2}$$ | No – must be calculated |
| Best Used For | Graphing and analysis | Algebraic manipulation |
| Conversion Needed? | No – already in usable form | Yes – complete the square first |
| Difficulty Level | Beginner-friendly | Intermediate |
► MY POV:
In my years of teaching coordinate geometry, I have found that students who spend extra time mastering the conversion between general and standard form consistently outperform their peers when it comes to more advanced conic section topics. I always tell my students: do not rush past completing the square. That single technique unlocks so much of what comes later in mathematics. Invest the time in it now, and it pays dividends throughout your entire academic journey.
Real-World Applications of Circle Equations in Coordinate Geometry
One question I hear constantly from students is: “When will I ever use this in real life?” The honest answer is: more often than you might expect. Circle equations appear across a wide range of fields, and understanding them gives you a genuine analytical advantage.
In engineering and architecture, circular structures like tunnels, arches, and domes are designed using precise circle equations. Engineers calculate load distribution, curvature, and structural integrity using the same standard form equation you are learning right now.
In physics and astronomy, the orbits of planets and satellites are modeled using circular and elliptical equations. The standard form of the circle equation is the starting point for understanding orbital mechanics at any level.
In computer graphics and game design, circles are used to define collision boundaries, render curved surfaces, and create visual effects. Every circular object you see in a video game or animated film is governed by a circle equation behind the scenes.
In navigation and GPS technology, the concept of trilateration uses intersecting circles to pinpoint a location. Each GPS satellite defines a circle of possible positions, and the intersection of three or more circles gives an exact location. That is coordinate geometry working in real time, every time you use a map on your phone.
In medicine, circular equations are used in imaging technologies like CT scans and MRI machines to reconstruct cross-sectional images of the human body. The mathematics of circles is embedded in the algorithms that produce those life-saving images.
[EXTERNAL LINK: GeeksforGeeks – Real-Life Applications of Circle – https://www.geeksforgeeks.org/maths/real-life-applications-of-circle/ – Detailed overview of how circles and their equations are applied across engineering, science, and technology] [[3]](#__3)
Common Mistakes When Working with Circle Equations
After teaching this topic for many years, I have seen the same mistakes come up again and again. Here are the most critical ones to watch out for, along with exactly how to fix them.
Mistake 1: Getting the Signs of h and k Wrong
This is the single most frequent error I see. In the equation $$(x – h)^2 + (y – k)^2 = r^2$$, the center is at $$(h, k)$$. If the equation reads $$(x + 3)^2 + (y – 5)^2 = 16$$, the center is at $$(-3, 5)$$, not $$(3, 5)$$. The addition sign inside the parenthesis means $$h = -3$$. Always rewrite the equation in the form $$(x – h)$$ to read the sign correctly.
Mistake 2: Forgetting to Square Root the Radius
The right side of the standard form equation gives you $$r^2$$, not $$r$$. If $$r^2 = 49$$, then $$r = 7$$, not $$49$$. I have seen students plot circles with a radius of 49 units when the actual radius is 7. Always take the square root before graphing.
Mistake 3: Errors When Completing the Square
When converting from general form to standard form, students often forget to add the completing-the-square values to both sides of the equation. If you add $$9$$ to the left side to complete the square, you must add $$9$$ to the right side as well. Skipping this step produces an incorrect radius every time.
Mistake 4: Assuming r Can Be Negative
The radius $$r$$ is always a positive value. It represents a physical length. Even if your calculation produces a negative value under the square root, that signals an error in the setup rather than a valid negative radius.
Mistake 5: Confusing the Circle Equation with the Ellipse Equation
The ellipse equation looks similar: $$\frac{(x-h)^2}{a^2} + \frac{(y-k)^2}{b^2} = 1$$. A circle is simply the special case where $$a = b = r$$. Students sometimes mix these up when the denominators are equal. If both denominators are the same, you have a circle, not an ellipse.
📌 KEY INSIGHT:
Before graphing any circle, I always recommend writing the equation in standard form first, then explicitly writing out the center coordinates and the radius value as separate labeled items. This two-second habit eliminates the majority of graphing errors immediately.
Key Lessons and Takeaways
- The standard form of a circle equation is $$(x – h)^2 + (y – k)^2 = r^2$$, where $$(h, k)$$ is the center and $$r$$ is the radius.
- The equation is derived directly from the Pythagorean theorem applied through the distance formula in coordinate geometry.
- To graph a circle, identify the center and radius first, then plot four directional points before drawing the curve.
- The general form $$x^2 + y^2 + Dx + Ey + F = 0$$ can be converted to standard form by completing the square for both $$x$$ and $$y$$ terms.
- Always watch the signs of $$h$$ and $$k$$: the center is at $$(h, k)$$, not at the values you see literally written in the equation.
- The radius is always $$r = \sqrt{r^2}$$, meaning you must take the square root of the right-hand side before graphing.
- Circle equations have direct real-world applications in engineering, GPS technology, physics, computer graphics, and medicine.
- A circle is a special case of an ellipse where both semi-axes are equal, making it the most symmetric of all conic sections.
[INTERNAL LINK: irfanedu.com – Graphing Lines in Coordinate Geometry – https://cms.irfanedu.com/act-prep/math/graphing-lines-in-coordinate-geometry/]
Frequently Asked Questions About Equations of Circles
Q1: What is the standard form of a circle equation?
The standard form of a circle equation is $$(x – h)^2 + (y – k)^2 = r^2$$. In this formula, $$(h, k)$$ is the center of the circle and $$r$$ is the radius. This form is the most useful for graphing because you can read the center and radius directly from the equation without any additional calculation. [[0]](#__0)
Q2: How do you find the center and radius from a circle equation?
If the equation is already in standard form, the center is $$(h, k)$$ and the radius is $$r = \sqrt{r^2}$$. Be careful with signs: if the equation reads $$(x + 4)^2 + (y – 3)^2 = 25$$, the center is $$(-4, 3)$$ and the radius is $$5$$. If the equation is in general form, you must complete the square first to convert it to standard form before reading off the center and radius. [[1]](#__1)
Q3: What is the difference between standard form and general form of a circle?
Standard form $$(x – h)^2 + (y – k)^2 = r^2$$ shows the center and radius directly and is ideal for graphing. General form $$x^2 + y^2 + Dx + Ey + F = 0$$ is an expanded algebraic version where the center and radius are not immediately visible. You convert from general to standard form by completing the square on both the $$x$$ and $$y$$ terms. [[2]](#__2)
Q4: How do you graph a circle in coordinate geometry?
To graph a circle, first write the equation in standard form. Then identify the center $$(h, k)$$ and the radius $$r$$. Plot the center on the coordinate plane. From the center, count $$r$$ units up, down, left, and right and mark those four points. Finally, draw a smooth circular curve through all four points. For greater accuracy, you can calculate and plot additional points using the distance formula. [[2]](#__2)
Q5: What happens when the center of the circle is at the origin?
When the center is at the origin $$(0, 0)$$, the values of $$h$$ and $$k$$ are both zero. Substituting into the standard form gives $$x^2 + y^2 = r^2$$. This is the simplest and most fundamental form of the circle equation. For example, a circle centered at the origin with radius $$6$$ has the equation $$x^2 + y^2 = 36$$. [[1]](#__1)
Q6: Why is the circle equation related to the Pythagorean theorem?
The circle equation is derived directly from the Pythagorean theorem. For any point $$(x, y)$$ on a circle with center $$(h, k)$$ and radius $$r$$, the horizontal distance from center to point is $$(x – h)$$ and the vertical distance is $$(y – k)$$. These form the two legs of a right triangle, with $$r$$ as the hypotenuse. Applying the Pythagorean theorem gives $$(x – h)^2 + (y – k)^2 = r^2$$, which is the standard form of the circle equation. [[1]](#__1)
Q7: What are real-world uses of the circle equation?
Circle equations are used across many fields. Engineers use them to design circular structures like tunnels and arches. GPS systems use intersecting circles in trilateration to determine precise locations. Computer graphics developers use circle equations to define object boundaries and render curved surfaces. Astronomers use circular and elliptical equations to model planetary orbits. Medical imaging technologies like CT scans also rely on circular geometry in their reconstruction algorithms. [[3]](#__3)
Final Thoughts on Mastering Circle Equations
The standard form of a circle equation is one of those foundational concepts that rewards every minute you invest in understanding it. From the elegant derivation rooted in the Pythagorean theorem to the clean four-step graphing process, this topic is far more logical and accessible than it first appears.
In my experience, the students who struggle most with circle equations are those who try to memorize the formula without understanding where it comes from. I always encourage a different approach: derive it yourself, draw it by hand, and connect every symbol in the equation to a real geometric meaning. That approach transforms a formula from something you might forget under exam pressure into something you can reconstruct from first principles at any time.
Take the time to practice converting between general and standard form, work through graphing examples with different centers and radii, and pay close attention to the sign conventions that trip up so many students. If you build this foundation solidly, every other conic section topic will feel significantly more manageable.
If you found this guide helpful, I encourage you to explore more coordinate geometry topics right here on IrfanEdu. Start with the Distance and Midpoint Formulas guide to strengthen the foundational skills that support everything covered in this article.
About the Author
Dr. Irfan Mansuri is an educator and SEO content expert with 15+ years of experience in academic writing and digital publishing. He specializes in making complex mathematical concepts accessible to learners at every level worldwide. Connect with him on LinkedIn: https://www.linkedin.com/in/dr-irfan-mansuri/